Whether you’re new to gardening or a seasoned pro, squash is a must-grow crop. With its assorted varieties, ease of cultivation, and high productivity rate, squash is one of the most satisfying vegetables to grow. The bonus? Squash plants will beautify your garden with their sprawling vines, large (sometimes ginormous) leaves, and vibrant, buttery-yellow blossoms!
This guide covers everything you need to know about growing squash, including garden preparation, planting, plant care, harvesting, and creative ways to enjoy your harvest.
Why Grow Squash?
Squash isn’t just delicious—it’s a nutritional powerhouse. Rich in vitamins A, C, and E, squash supports immune health, promotes glowing skin, and aids in vision health. Additionally, its high fiber content supports digestion, while minerals like magnesium and potassium benefit your heart health.
Squash is also a gardener’s dream-come-true. Squash plants are relatively low-maintenance; with proper care, one plant can yield an amazingly abundant harvest. Whether you prefer summer varieties like zucchini and yellow squash or winter varieties like butternut and acorn squash, there’s a type for every taste and culinary style. In fact, with a bit of strategic planning, you can nurture both winter and summer squash crops for your year round pleasure.
Types of Squash
- Summer Squash: These varieties have tender skin and are quick-growing. You will harvest when the fruit is still young; these are best eaten fresh. Popular varieties include:
- Zucchini—This summer squash looks somewhat similar to a cucumber in shape and color but tastes nothing like it. It has a mild flavor, lending itself well to grilling, sautéing, or baking into breads and muffins. Its high water and fiber content is an aid to weight management and serves to promote hydration. Zucchini Squash has only 17 calories per 100 grams (about 5-oz sliced)
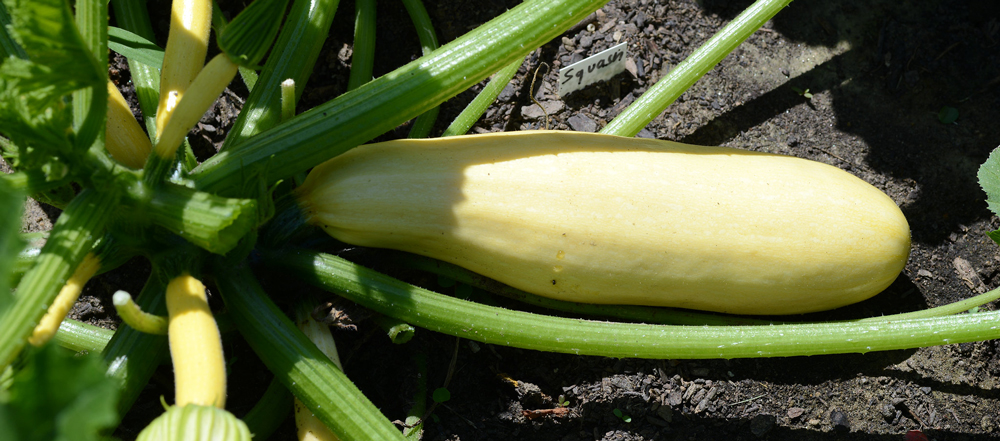
- Yellow Crookneck—This summer squash is so-named due to its crooked ‘neck’. You may know this variety as yellow squash. Its thin, flavorful skin encases a somewhat buttery-flavored, tender, water-forward, creamy white flesh (even the seeds are soft and edible!). Crookneck Squash is best when harvested young, as the skin thickens and develops a bumpy texture when it’s a bit past its prime; this is a good tip to remember when shopping in the grocery store. About 3.5 oz of sliced Yellow Crookneck is about 94 percent water (Hydrate! Hydrate!) and has only 19 calories. This variety can be eaten raw—or—you can prepare it as you would zucchini; they are basically interchangeable.
- Pattypan—This summer squash variety is sometimes called scalloped or sunburst squash due to its very recognizable form. If the kiddos turn their noses up at zucchini or crookneck squash, they may be willing to try Pattypan Squash, simply due to its un-squash-like, flying-saucer shape. In fact, they may enjoy planting, nurturing, and watching these pretty yellow, creamy white, or sometimes striped, green fruits as they grow in your garden. Pattypan is best harvested when very young, between 2 to 4 inches. The larger they get, the tougher they are. 130 grams (about 1 cup) of sliced Pattypan only has about 23 calories, but has 2 grams of fiber and protein, as well as a plethora of vitamins and minerals.
- Winter Squash: These varieties are hard-skinned, are harvested in the fall, and will store well for months. The most popular varieties are:
- Butternut—This winter squash variety is orange-skinned with orange flesh, appreciated for its sweet, somewhat nutty flavor and for its versatility in the kitchen. You can eat Butternut Squash raw; however, the preferred way to prepare it is either roasted or baked. One cup has only 82 calories, but can boast 2 grams of protein, a respectable 7 grams of fiber and a whopping 457% of the RDV (Recommended Daily Value) for Vitamin A, and 52% of the RDV for Vitamin C. It’s also an excellent source of Folate, Potassium and Manganese.
- Acorn—This winter squash is named after its acorn-like shape. Dark green, often with a broad, brightly colored orange spot, you will not mistake this squash for any other. Its mild, nutty-flavored flesh is yellowy-orange, and though classified as a fruit, it is usually considered a starchy vegetable (serve it in place of potatoes!). One cooked cup of Acorn Squash has 115 calories with 2 grams of protein and 9 grams of fiber. With only 21 carb grams (after subtracting the fiber benefit), this winter squash is an exceptional source of Magnesium, Potassium, and Manganese, with 22%, 26%, and 25%, respectively.
- Spaghetti—This winter variety is most often utilized as a spaghetti substitute. When cooked, its solid flesh is able to be easily separated from the skin in strands that look amazingly like spaghetti. Though available in ivory and orange, the yellow variety is the most popular due to its ready availability in your local grocery store. Carotene is at its highest in the orange variety, though all are a good source of beta carotene, potassium, and folic acid. One cup, boiled or baked (without added fat or sodium) has only 42 calories and is low in carbs, at only 10%. In addition to the many vitamins and minerals, Spaghetti Squash is a good, natural source of polyphenols; these help to inhibit inflammation in your body.
- Hubbard—This winter squash is available with differently colored skins, most often, dark green, pastel blue, or light orange. The skin will be hard and bumpy and is usually decorated with splotches and streaks of creamy white. Hubbard Squash can grow from 15 to 50 pounds, so they are often sold in sections to make it easier to handle and prepare. Its closest relatives are banana and buttercup squash, as well as Cinderella pumpkins. Its name comes from one of the first gardeners to grow it in Massachusetts (Old Mother Hubbard?). If kept cool and dry, Hubbard Squash can be stored for more than 5 months, its flavor actually continuing to develop as the starches gradually change to sugar. One cooked cup has only 102 calories and just 12 grams of carbs after subtracting its fiber content. It is super high in Vitamin A, containing 247% of the DV (Daily Value) and 32% when it comes to Vitamin C.
Let’s Get Started! You’ll Need:
- Squash seeds or starter plants
- A sunny garden spot or container (minimum 5 gallons for each plant)
- Compost or organic fertilizer
- Trellis or sturdy support (for vining types)
- Mulch for moisture retention and weed suppression
- Garden trowel or hoe
- Watering can or hose
- Epsom salt for occasional feeding (optional)
Step-by-Step Planting Instructions
Preparing the Soil: Squash thrives in nutrient-rich, well-draining soil with a pH between 6.0 and 6.8. Before planting, clear the weeds by pulling from the roots and mix in compost or aged manure to improve your soil fertility and moisture retention. pH detectors are very affordable and well-worth the tiny expense.
Planting Time: Squash is frost-sensitive, so wait until after the last spring frost and when soil temperatures reach at least 60°F (15°C). Soil thermometers are quite inexpensive, while you can research the last average frost date for your zone in the Farmer’s Almanac. You can usually find a copy near the checkout line at your grocery store, but it is also available online. In warmer climates, squash can be planted successively (sowing seeds or planting seedlings every 2 or 3 weeks) for an extended harvest.
Starting Squash Plants from Seed:
- Hill Method (Preferred for All Squash Varieties): Mound soil into small hills about 12 inches wide and 6 inches high. Sow 4 to 5 seeds per hill, spacing hills 3 to 5 feet apart. Cover seeds with 1 inch of soil and water gently, but thoroughly, being careful not to dislodge the seeds. Thin to 2 to 3 plants per hill once seedlings emerge, choosing the most robust growers after the true leaves have emerged (the 1st leaves are not considered ‘true’ leaves).
- Row Method: Sow seeds 3 to 4 inches apart in rows spaced 4 to 6 feet apart. Thin seedlings to 18 to 24 inches apart using the same parameters as for the Hill Method above.
Transplanting Starter Plants:
- Dig a hole twice as wide as the plant’s root ball, ensuring that it is planted at the same depth as in its original container.
- Space plants 18 to 24 inches apart (for bush types) or 3 to 5 feet apart (for vining types).
- Water thoroughly after planting, adding additional soil, if necessary, to account for the water compacting the soil slightly. Do not manually compact the soil.
Caring for Your Squash Plants
- Watering:
- Provide 1.5 to 2 inches of water weekly, depending upon the current climatic conditions, watering deeply at the soil level to encourage strong root systems.
- Avoid overhead watering to reduce the risk of powdery mildew and other fungal diseases.
- Fertilizing:
- Apply a balanced fertilizer (10-10-10) once plants start to flower. High nitrogen fertilizer will ensure lots of foliage, but fewer blossoms and less fruit.
- Incorporate occasional feeding with an Epsom salt solution (1 tablespoon per gallon of water); use sparingly—no more than once a month.
- Mulching:
- Apply a 2 to 3 inch layer of mulch to retain soil moisture, regulate soil temperature, and suppress weed growth.
Trellising and Staking
- Benefits:
- Encourages vertical growth for vining varieties, saving garden space.
- Improves air circulation, reducing the risk for pests and diseases.
- Keeps fruits clean and makes harvesting so much easier.
- Pro Trellising Tips:
- Use sturdy materials like EMT conduit, metal poles, or wooden stakes.
- Secure vines to the trellis gently, using soft ties or jute every few inches.
- Create hammocks using mesh or fabric to support heavy fruits.
- Pro Staking Tips:
- Place stakes carefully, providing enough space to avoid damaging your plants’ roots.
- Drive stakes at least a foot into the ground for stability.
Pollination: Ensuring Fruit Development
- Understanding Flower Types:
- Male flowers will appear first and produce pollen.
- Female flowers have a small bulb at the base and are pollenless.
- Hand Pollination:
- If natural pollinators, like bees and butterflies, are scarce, transfer pollen from male flowers to female flowers using a soft paintbrush or by gently touching the male and female flowers together.
- Perform hand pollination in the morning when the blossoms are open.
Pest and Disease Management
- Squash Vine Borers:
Prevention:
- Wrap aluminum foil around the stem at soil level (4 to 6 inches high)
- Delay planting to avoid peak borer activity, usually in mid to late June. These insects overwinter in the soil in the pupa stage, emerging around mid-June as adults. Adult females can begin laying eggs in 3-days.
- Bury parts of the vine to encourage additional root growth.
Control:
- Look for holes in the stems with sawdust-like frass (the fine powdery refuse left as the result of the borers chowing down).
- Carefully slit the stem, remove the larvae, and cover the stem with soil.
- Squash Bugs:
- Handpick bugs and their eggs from leaves.
- Use trap crops to lure them away. Studies have shown Blue Hubbard squash to be the most attractive to squash bugs.
- Powdery Mildew:
Prevention:
- Water at the base of your plants and ensure good air circulation. Thinning the foliage will help to improve air circulation.
Treatment:
- Spray a hydrogen peroxide solution (½ to ¾ cup per gallon of water).
- Remove and discard affected leaves.
How and When to Harvest Your Squash
- Summer Squash:
- Harvest when fruits are 6 to 8 inches long or 2 to 4 inches wide for Pattypan varieties.
- Regular harvesting encourages continued fruit production.
- Winter Squash:
- Harvest when the rind is hard and cannot be pierced with a fingernail.
- Leave at least a 1-inch stem attached to improve storage life.
- Cure squash in a warm, dry area for 10 to 14 days to harden the skin.
Preserving Squash: Why Methods Differ for Summer and Winter Squash
The preservation methods for summer and winter squash vary due to their distinct differences and storage potentials.
Summer Squash (i.e.: zucchini, pattypan, and yellow squash) has soft, thin skin and a high moisture content. This limits the length of time it can be stored.
Winter Squash (i.e.: butternut, acorn, Hubbard, and spaghetti squash) has hard, thick rinds and dense, starchy flesh, making it naturally suited for long-term storage.
Preserving Summer Squash
Freezing
Frozen summer squash will retain its quality for up to 10 months.
- Wash and slice squash into rounds or strips.
- Blanch in boiling water for 2 to 3 minutes, then quickly submerge in an ice bath.
- Drain, pat dry, and freeze in airtight containers or freezer bags.
- Label with the date. You may want to include the quantity here as well.
Dehydrating
- Slice squash thinly and place on dehydrator trays.
- Dry at 125°F until brittle.
- Store in airtight containers or vacuum-sealed bags for long-term storage.
- Label with the date. You may want to include the hydrated (the quantity before dehydrating) quantity here as well.
Canning
Summer squash can be cubed and canned in a pressure canner at 10 pounds pressure for 40 minutes, following proper sterilization and safety protocols. Due to its low acid content, you should only use a pressure canner, not a water-bath canner. Store sealed jars in a cool, dark place for up to one year. Be sure to date the jars.
Preserving Winter Squash
Cleaning for Storage
Wipe the rind with a vinegar-water solution or mild bleach solution to kill mold spores and to extend shelf life.
Curing
Cure harvested squash in a warm, dry place (75–85°F) with good ventilation for 10 to 14 days to harden the rind and improve its storage potential.
Storage
- Store cured squash in a cool (50–60°F), dry, well-ventilated space. Avoid stacking to prevent bruising and to allow adequate air circulation.
- Storage duration depends upon the variety: butternut squash can last up to a year, while acorn squash typically lasts 2 to 3 months.
Freezing
- Peel, cut into halves or quarters, remove seeds, and dice squash into 1-inch cubes.
- Blanch cubes for 3 to 5 minutes in boiling water, then immediately plunge into an ice bath.
- Pat dry well and freeze in freezer bags or containers, removing as much air as possible.
Canning
- Cut squash into 1-inch cubes for safe pressure canning.
- Process the squash using a pressure canner, following USDA guidelines for low-acid foods to ensure safety.
Cooking Methods and Ideas for Squash
- Roasting: Toss with olive oil, salt, and spices, roasting at 400°F for 25 to 30 minutes. As a sweet alternative, you can use butter or olive oil and brown sugar.
- Mashing: Use boiled or steamed squash as a substitute for potatoes.
- Baking: Incorporate butternut squash into pies, muffins, or breads. Zucchini bread is a favorite and can be frozen, once cooled, for future use.
There you have it! This should be everything you need to know about how to grow, harvest, preserve, and prepare your summer or winter squash harvest.
However, if you still have questions, or if you’d like to share something you’ve learned, or even a favorite method of preparation or a delicious recipe, please do so in the comments below. We would love to hear from you!


